How to Photograph Your Room for AI Design (Best Results)
A practical guide to taking the best room photo for AI interior design. Learn the right angle, lighting, framing, and prep so AI redesigns your space accurately the first time.
Knowing how to photograph your room for AI design is the single biggest factor in whether your redesign looks photoreal and useful — or slightly off. Photo-based tools like DecorAI read your existing space from the picture you upload: your windows, walls, proportions, and layout all come from that one shot. Give the AI a clear, well-lit, well-framed photo and it has everything it needs to restyle your real room beautifully.
The good news: you do not need a camera, a tripod, or any skill. A phone and a few simple habits are enough. This guide walks through the exact angle, lighting, framing, and prep that produce the best AI interior design results, plus the common mistakes that quietly ruin a render.
Key Takeaways
- Shoot from a corner so two walls and the floor are visible — this gives the AI the depth and geometry it needs.
- Use soft, even, natural light. Open the curtains, turn on the lights, and avoid harsh shadows or a bright window blowing out the frame.
- Hold the phone level at chest height in landscape orientation, and capture the whole room from floor to ceiling.
- Tidy first. Clear obvious clutter so the AI restyles the space instead of the mess — but you do not need an empty room.
- Keep it sharp and well-exposed. Wipe the lens, hold steady, and avoid heavy zoom, filters, or extreme wide-angle distortion.
- Upload your photo to DecorAI free and see your room redesigned in seconds.
Why Does the Photo Matter So Much for AI Design?
With a photo-based AI design tool, the picture is the blueprint. Unlike text-only generators that invent a fictional room from words, a tool like DecorAI works from your actual space — it detects the room's structure, then re-renders the surfaces, furniture, and styling on top of that real geometry. If the photo is dark, tilted, cropped, or cluttered, the AI has to guess at the parts it cannot see, and guesses are where results drift. A clear photo removes that uncertainty, so the redesign lands on the first try.
Think of it the way a human designer would: hand them a bright, straight-on photo of the whole room and they understand it instantly. Hand them a dim, crooked close-up of one corner and they have to fill in the rest. The AI is no different.
What Is the Best Angle to Photograph a Room?
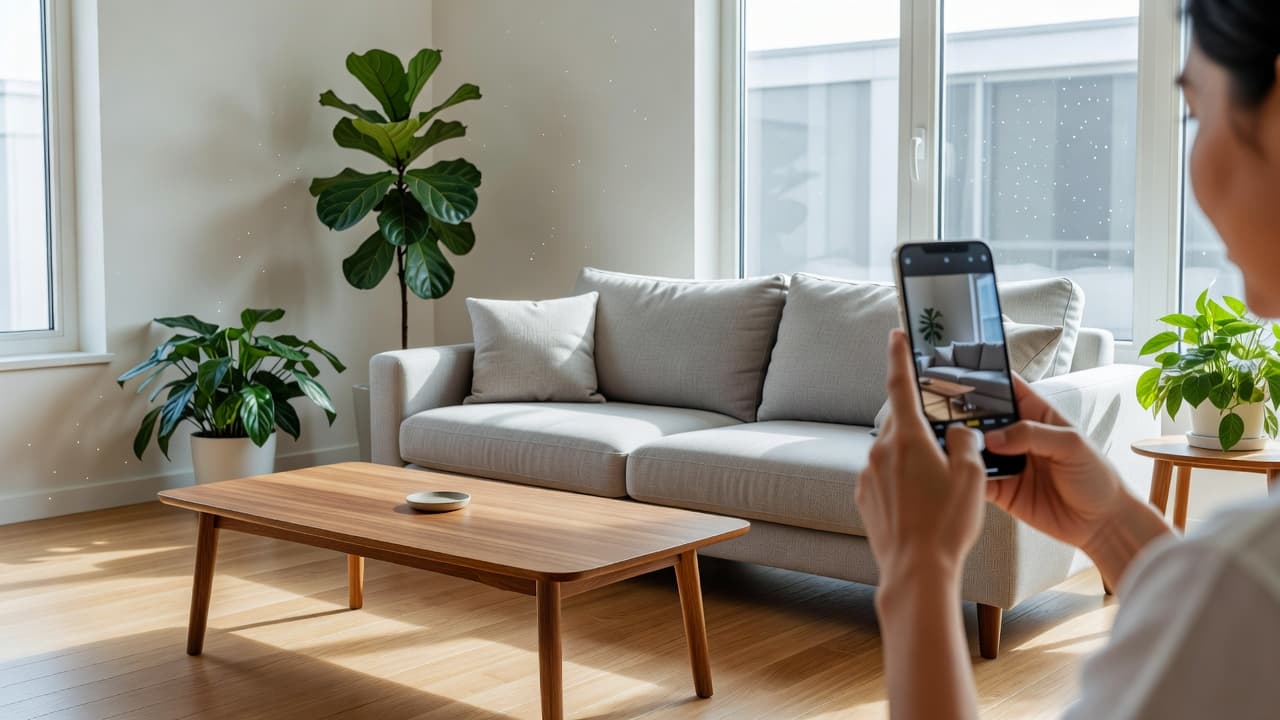
The best angle is from a corner of the room, shooting diagonally across toward the opposite corner. This captures two walls, the floor, and ideally a bit of the ceiling, which gives the AI a clear sense of depth, scale, and how the space fits together. A flat, straight-on shot of a single wall hides the room's geometry; a corner shot reveals it.
Stand with your back near one corner, hold the phone at about chest height, and keep it level — not tilted up or down. Tilting introduces keystone distortion (walls that lean in or out), which can confuse the redesign. If your room is small, step into the doorway and shoot inward to get as much of the space as possible.
Landscape, not portrait
Hold your phone horizontally (landscape) for most rooms. Landscape matches how rooms are proportioned and captures more of the walls and floor in one frame. Portrait orientation tends to crop out the sides of the room, leaving the AI less context to work with. Capture the room from floor to ceiling so nothing important is cut off.
How Should I Light the Room for the Best Photo?
Soft, even, natural light produces the most accurate results. The goal is balanced exposure — bright enough to see every surface clearly, without dark shadows swallowing detail or a window so bright it blows out into pure white. Daytime is ideal: open the curtains and blinds, and turn on the room's lights too so the corners are not lost in shadow.
- Shoot during the day when possible, with curtains open for diffuse natural light.
- Avoid shooting straight into a bright window — it tricks the camera into underexposing the rest of the room. Position yourself so windows are to the side.
- Turn on the lights to fill shadowed corners, but skip the phone's direct flash, which flattens the scene and creates harsh hotspots.
- Watch for color casts from very warm bulbs; mixed daylight and lamp light usually reads most naturally.
How Should I Frame and Prep the Room?
Frame the whole room, not a detail. The AI redesigns what it can see, so capturing the full space — floor, walls, and the main furniture in place — gives it the most to work with. Stand far enough back (or in the doorway) that the key elements all fit in one shot.
A quick tidy goes a long way. You do not need to empty the room, but clearing obvious clutter — laundry, dishes, stray cables, scattered toys — helps the AI focus on restyling the space rather than reinterpreting the mess. Leaving the big pieces (sofa, bed, table) in place is fine and often helpful, because they show how the room is used and scaled. If you are working with a compact space, our guide to AI interior design for small spaces has extra tips for tight footprints.
Technical Tips for a Sharp, Usable Photo
A few small habits keep your photo crisp and free of the artifacts that degrade a redesign. Blurry or noisy images force the AI to work with less information, so sharpness matters more than megapixels.
- Wipe the lens. A smudged phone lens is the most common cause of a soft, hazy photo.
- Hold steady. Brace your elbows or lean against a wall; tap to focus before you shoot and wait for it to lock.
- Skip the zoom. Digital zoom adds image noise and softness. Move your feet instead of zooming.
- Avoid filters and heavy editing. Upload a natural, true-to-life photo so the AI sees real colors and materials.
- Mind ultra-wide lenses. They fit more in but bend straight lines at the edges; a standard lens usually looks more natural.
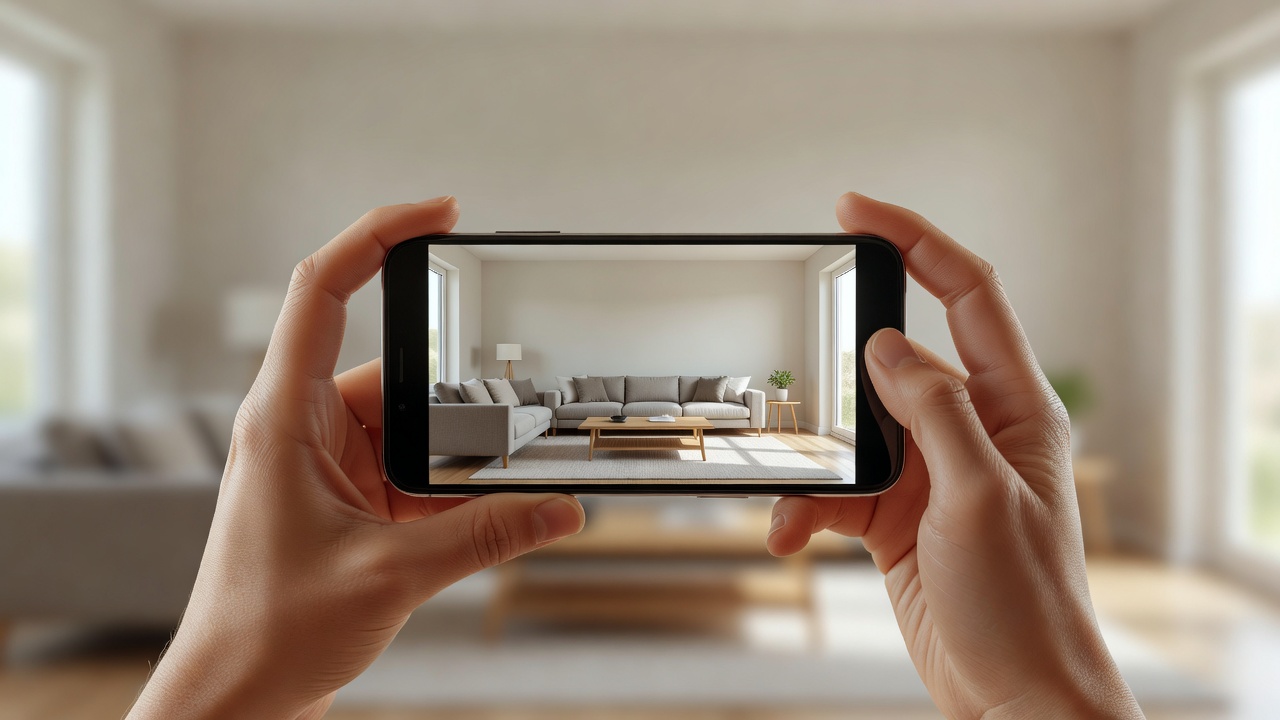
How DecorAI Turns Your Photo Into a Redesign
Once you have a good photo, the rest is fast. DecorAI is a browser-based tool: you upload your room photo, choose a style (or add a short prompt describing the look you want), and it redesigns your actual space photorealistically in seconds — keeping your windows, layout, and proportions intact. Because it starts from your real room, you are seeing your space, not a generic stock render. Browse every look on our styles page or start from the homepage. To get the style request exactly right, pair this with our AI interior design prompts guide, and to understand the full workflow see how an AI room visualizer works.
Snap One Photo, See Your Room Redesigned — Free
Take a bright, level photo of your room, upload it to DecorAI, pick a style, and watch your actual space transform in seconds. No download, no designer, no guesswork.
Common Room-Photo Mistakes to Avoid
- Shooting in the dark: dim photos hide detail and force the AI to guess. Add light first.
- Tilting the phone up or down: creates leaning walls. Keep the camera level.
- Photographing only one wall or a corner detail: the AI needs the whole room for context.
- Backlighting from a window: blows out the frame. Keep bright windows to the side.
- Heavy clutter: distracts the redesign. A quick tidy beats a perfect camera.
- Filters, zoom, and blur: they strip away the real detail the AI relies on.
Room Photography for AI Design FAQ
What is the best angle to photograph a room for AI design?
Shoot from a corner, diagonally across the room, so two walls and the floor are visible. Hold the phone level at chest height in landscape orientation and capture the space from floor to ceiling. This corner angle gives the AI the depth and geometry it needs to redesign accurately.
Do I need to empty the room before taking the photo?
No. You only need to clear obvious clutter like laundry, dishes, and stray cables. Leaving the main furniture in place is fine and often helpful, since it shows the AI how the room is scaled and used. The goal is a clean, readable space — not an empty one.
What lighting is best for AI room photos?
Soft, even, natural daylight is best. Open the curtains, turn on the room lights to fill shadows, and avoid shooting straight into a bright window or using the phone's flash. The aim is a balanced exposure where every surface is clearly visible.
Can I use an old or low-resolution photo?
You can, but a recent, sharp, well-lit photo always produces better results. If an old photo is blurry, dark, or only shows part of the room, retake it — a clear shot from your phone takes seconds and dramatically improves the redesign.
How do I get my photo into DecorAI?
Open the DecorAI web app in any browser, upload your room photo, choose a style or type a short prompt, and the AI redesigns your real space in seconds. For a full walkthrough, see our guide on how to use AI interior design apps.
Conclusion
Mastering how to photograph your room for AI design takes about a minute and pays off every time: shoot from a corner, keep the phone level and in landscape, light the room evenly, frame the whole space, and tidy the obvious clutter. Do that and a photo-based tool has everything it needs to restyle your real room on the first try. The fastest way to see it in action is to upload your photo to DecorAI and pick a style. For the next step, learn to turn that photo into a full style plan.
Your Redesign Starts With One Good Photo
Open DecorAI's web app, upload your room photo, pick a style, and watch your real room transform in seconds. Your first designs are completely free.
Try the DecorAI Web App Free →No credit card required · Works on any device with a browser
Visualize Your Dream Home Instantly
Don't just read about it. Experience the power of AI interior design with DecorAI's free tool.
Start Designing for FreeWritten by
DecorAI Team
Editorial Team